So, you open the long-awaited envelope with the sewing patterns, and your eyes run wide from a variety of symbols and signs in an unfamiliar language. It’s okay when you’re trying to jump into something new, don’t despair. However, before you start sewing, it is better to understand the theory and understand how to read a sewing pattern.
In this article, we have combined basic theoretical information on how to use sewing patterns with useful practical tips. Be sure, after reading this article, even a beginner will cope with a sewing pattern!

Contents
- 1 Where can you get sewing patterns?
- 2 Different formats of sewing patterns
- 3 Sewing pattern envelope – How to read a sewing pattern for beginners?
- 4 How to read sewing patterns – Make sense of strange characters
- 5 FAQ’s
- 6 Conclusion
Where can you get sewing patterns?
In the United States, you can get sewing patterns from fabric and craft stores like Jo-Ann Fabric, Michaels, and Walmart. Online options include Amazon, Etsy, and the websites of pattern companies like BurdaStyle. Additionally, some libraries and secondhand shops may have sewing patterns available, and sewing and quilting shows often offer a wide selection.
Different formats of sewing patterns
You can purchase sewing patterns in several formats, including printed paper patterns, PDF downloads, digital files for use with cutting machines, and pre-cut kits containing materials and instructions.

For example on the website simplicity.com you can choose between a paper pattern or a PDF download.
Sewing pattern envelope – How to read a sewing pattern for beginners?
Do not rush to throw away the envelope with the sewing patterns, barely shaking the contents out of it. There is also useful information on the envelope itself.
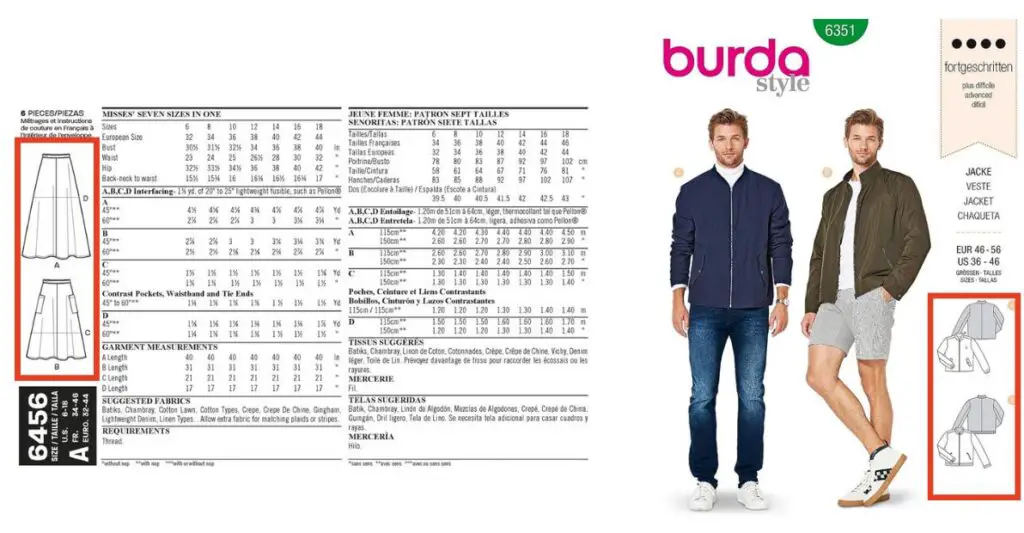
Pay attention to the front and back sides of the envelope
On the front side you can see:
Image of the model
The photo shows the model wearing the garment you are about to sew. In order for you to be guided by how the product should look in the final result.

Design model number or name
What do sewing pattern numbers mean? The pattern number is needed to identify the model, but still, some smaller pattern companies give the model a name to make it easily recognizable in the market.

The pattern size
You can usually find the pattern size on the front of the sewing pattern envelope or packaging. It’s often printed clearly and might say something like “Size 10” or “Size Large.”
This size corresponds to the measurements for the garment or your body.
The size of the patterns of New Look you can find on the back of the envelope:

And the size of Burda Patterns you can find on the front cover.

Suggested fabric
The suggested fabric is the information about what type of fabric is ideal for the selected model. It’s important to follow these recommendations to ensure your finished project turns out just right, with the right fit and appearance.

Tip: Try to use the exact type of fabric that the sewing pattern companies recommend. If you decide to change the type of fabric, remember the basic rule: do not replace knitted fabrics with other types of fabrics. So you are guaranteed to get an unsatisfactory result.
Skill level
Some sewing pattern makers indicate on the envelope the level of difficulty of the pattern: beginner, advanced, professional. You can also see the approximate time calculated for tailoring.

The back of the envelope is also important!
On the back of the sewing pattern envelope, you can find:

List of additional purchases
This is information about whether and in what quantity you need to buy zippers, buttons, laces, and ribbons.
Size chart
This table usually suggests several criteria by which you can find your size (bust, chest circumference, waist, hips, and height). Don’t skip this “body measurements step” as the sizes will be different from what you’re used to in stores. You should check body measurements againto find the right size each time before sewing on new patterns.

Tip: If your measurements are non-standard and do not fit a certain size in the table, you have 2 options: optimize the pattern for your parameters while sewing, and choose a size as close as possible to your parameters.
In the latter case, we recommend focusing on your maximum volume when choosing, since it is always easier to make a groove than to grind additional fabric.
We also recommend that you take into account the lightness of the design – leave the volume in stock so that the thing is easy to put on and, for example.
Line drawings
If you didn’t see the picture of the line drawings on the front side or on the back, you will definitely see it here or, in extreme cases, inside the envelope.

This is necessary to understand where fasteners, cutouts, and other design subtleties are located.
Types of sewing patterns
There are 3 types of sewing patterns that are designed to easily find yours by height and approximate measurements. Your options are: for medium height (5.5-5.6 feet) with medium proportions – Misses, for large volumes in the chest and hips – Women; for low rise (5.2-5.4 feet) models with a shortened waist – Petite.
Fabric Requirements
This information will help you determine how much fabric you need to purchase, depending on the size and style. Here you can find information about lining fabric and interfacing.
What do 45 and 60 mean on a sewing pattern? Please note that fabrics come in two standard sizes – 45 inches (115 cm) and 60 inches (140 cm).

Contents of an envelope with a pattern
Inside the envelope with sewing patterns, you can find instructions and a sewing pattern template (usually printed on a large sheet of thin cigarette paper).
Reading a sewing pattern and the instructions carefully before you start cutting something will help you avoid a lot of mistakes! Also, you should double-check the finished garment measurements.
Tip: If the sewing instructions are large, staple the pages in the top corner, so you can clearly keep track of where you are. If your workplace is small, put the instructions next to the sewing machine and fold over the pages.
We recommend that you find the layout page. Here is a way to arrange pattern pieces of a sewing pattern on the fabric so that you have enough fabric indicated on the pattern envelope.
When laying the pattern piece on the fabric, make sure that the patterns on the fabric are in the right place and on the right side.
Pattern cut lines
On a sewing pattern template, you may notice different types of dotted lines. Every kind of dotted line corresponds to a specific clothing size from the table.

You can cut the pattern piece immediately to the desired size. However, if you want to use it several times, we recommend cutting the sewing paper pattern to the largest size, and then folding it along the dotted line when tracing the fabric.
If you are sure you want to create your first piece of clothing and you don’t have a sewing machine yet, read our article: How to choose a sewing machine.
Pattern Tissue
Pattern tissue is the thin, semi-transparent paper that sewing patterns are printed on, and you use it as a template to cut out fabric pieces for your sewing project.

It’s designed to be easy to work with and see through while tracing or cutting the pattern.
Pattern layout guide
A sewing pattern layout guide is like a map that shows you how to place your pattern pieces on your fabric. It helps you use your fabric efficiently, so you don’t waste any, and it shows you the right way to line up the pieces with the fabric’s grain (which affects how your garment fits).
It also points out where to match up different parts of the pattern so your sewing comes out just right. Think of it as your sewing project’s GPS!
How to read sewing patterns – Make sense of strange characters
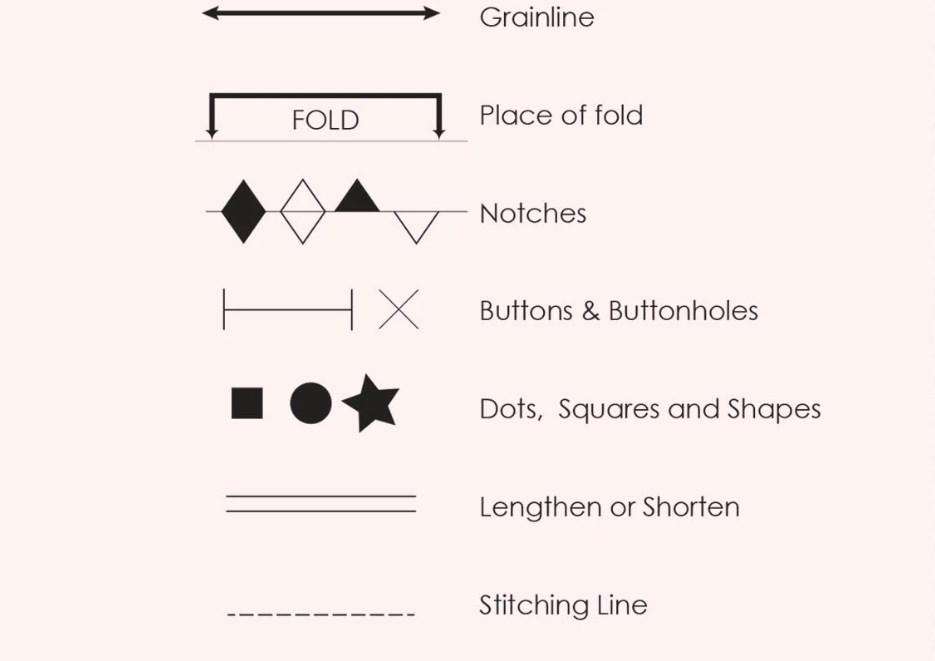
So, let’s understand: What do sewing pattern symbols mean?
Grainline
Grainline exists to ensure that you maintain the correct orientation of the threads of the fabric.
Ideally, the arrow is ‘on grain’ with the threads of the fabric, it shows the direction in which you should cut the fabric. The edge of the fabric must always be parallel to the fibers.

Adjustment line
Adjustment line – two parallel solid pattern lines, show where to lengthen or shorten the pattern piece.
Fold line
A dotted or solid fold line with a bracketed line above, with two arrows at the ends pointing to a line below. This is the designation of the edge of the fabric with a fold. The fabric cannot be cut at this fold.
Easing line
A short dotted dashed line with guide arrows at both ends. These sewing symbols mark the area to be eased.
Cutting line
A cutting line is a solid line with a picture of scissors – cut here, this is the edge of the picture template.

Seam line
A simple dotted line – in this place, the fabric needs to be sewn with other pattern pieces. Sometimes there are arrows on this line to indicate which direction the seam should go.
Darts
The letter V from the center of which a dotted line extends outward. This symbol often goes next to others: squares, dots, or triangles. This is a hint of where to bend the part to fit it to the anatomy of the body.
Various shapes (squares, dots, triangles, etc. symbols)
Markings vary by manufacturer. In this place, it is shown exactly how to combine the given tissue pattern piece with respect to other pattern pieces.
Center
A straight line of dots and dashes. It exists to align the sketch and runs vertically with respect to the center front and center back of the pattern piece of your garment.
The button pattern symbol looks like this, but the buttonhole symbol looks like a straight line with notches at the ends that run perpendicular. Loop, usually true to size.
Zipper
The zipper pattern symbol is a straight line with arrows at both ends. The arrows point to the line.
Seam allowance
Seam allowance is a ruler pattern symbol with fraction markings (there can be 2 lines and fraction markings can be shown on the side). This is the designation of the area between the edge of the fabric and the seam (usually 15 mm).
Circle with a plus inside
This designation of the bust, waist, biceps, or hips – depends on the context.
Notch
Lines combined with triangle or diamond symbols are seam lines that must match. The number of figures depicted matters: 1 figure – the front of the pattern, 2 figures – the back, 3 figures – other parts.
Tucks
Circles at the ends of lines or corners.
Tip: pay attention to how many pattern pieces you need to cut. On many patterns, it is indicated to cut 2 parts – this is necessary for lining or creating symmetry.
Sometimes it is indicated to cut 2 pattern parts in a mirror. To do this, fold the fabric together with the wrong or right side and cut both parts according to one pattern.

FAQ’s
How do you read a pattern and know how much fabric?
To know how much fabric you need from a sewing pattern, start by checking the pattern envelope for recommended fabric types and yardage. Select your size and consult the layout diagrams in the instructions for the correct fabric width (usually 45 or 60 inches). Measure the length of each pattern piece and add them up to calculate the total fabric length required, and consider buying a bit extra for mistakes or adjustments.
What do pattern symbols mean?
Sewing pattern symbols are like visual clues on the pattern pieces. They show you where to cut the fabric, how to fold it, and where to sew seams. Symbols like notches and arrows help you put everything together correctly for a well-fitting garment or project.
Are sewing patterns good for beginners?
Sewing patterns can be good for beginners, but it’s important to pick the right ones. Look for patterns labeled as “easy” or “beginner-friendly” as they come with clear instructions and simple designs. Start with straightforward projects like skirts or bags before attempting more complex ones. Don’t forget to ask for help, practice with scrap fabric, and take your time to learn and improve your sewing skills.
How do you follow a sewing pattern for beginners?
Gather Your Supplies: Make sure you have all the materials listed on the pattern, like fabric and thread.
Read the Instructions: Go through the pattern’s step-by-step instructions carefully. Understand what each step means before moving on.
Cut and Sew: Cut out the pattern pieces from your fabric and sew them together as the instructions guide you, following the specified seam allowances.
Try It On: Periodically try on your project to check the fit. Make any necessary adjustments as you go.
Finish Up: Once you’re happy with how it looks and fits, finish your seams and details, press everything to make it neat, and then enjoy using or wearing your creation.
Where can I get free patterns?
You can find free sewing patterns in several places. Look on websites like PatternReview and sewing forums, where members often share patterns. Sewing bloggers frequently offer free downloadable patterns on their websites, and some YouTubers provide patterns with step-by-step video tutorials. Check sewing pattern companies’ websites and newsletters for occasional free pattern promotions. Also, explore social media platforms like Pinterest and Instagram for sewists who share their projects and links to free patterns they’ve used. Always be mindful of copyright and usage terms when downloading and using free patterns.
Conclusion
So, now you know where exactly to lengthen or shorten the pattern piece!
We hope that our detailed step-by-step instruction will help you understand how easy it is to read a sewing pattern, and you will create your first garment yourself.
We wish you creative success and high-quality results.
If you want to create your first piece of clothing, here is an instruction how to sew straight.
Read also: Serger vs Sewing machine – The Comparison

Hi everyone and welcome to my blog!
My name is Liz, and I started sewing when my son was born. First I repaired the holes in children’s pants, then I dared to do more challenging projects like sewing home decor and children’s clothing. Now it is my hobby where I come to rest, let my creativity run wild, and create things that please me and enhance my home.
I would love to help other sewing beginners and enthusiasts through my blog by sharing tips and tricks for this great hobby.

